Comics Plotting Tools
 One aspect to writing comics that can be tricky is figuring out how you go from a rough idea of what happens in an issue to a finished script. Now, all of our writing processes will be a little different. And you may even find your writing process varies from story to story. (I know mine does.) What I find most helpful is to have a number of tools and strategies for getting your ideas in order before trying to sit in front of the keyboard and typing “PAGE ONE.” Often, I’ll use a combination of these in the pre-scripting stage to keep moving production forward.
1.) Notecards
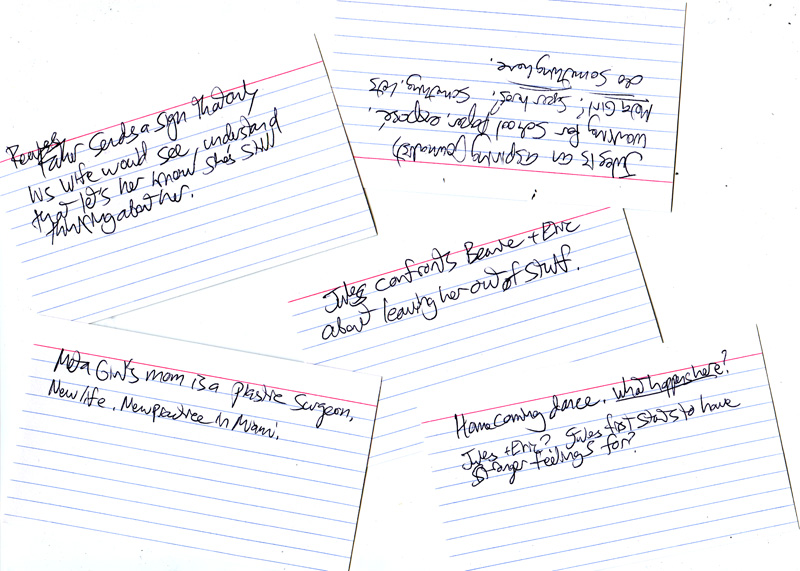
Good old fashioned notecards! They worked for that Abe Lincoln biography in 4th grade, and they work for making comics, too. I like using notecards when I have a bunch of ideas, but I’m not very sure how they all fit together. As this is still the brainstorming stage, and notecards are cheap, I’m not very discerning about what goes on a card. It might be a scene or a beat in a scene. It might be a line of dialog. It might be a character note or a wacky idea. Some of these will get tossed almost immediately after jotting them down. But once I have a nice stack of cards, I then spread them all out and start putting some order to them. Also, if you don’t like the killing of trees, there are writing programs out there like Scrivener that has a note card feature which is pretty cool.
2.) The Quick Written Outline
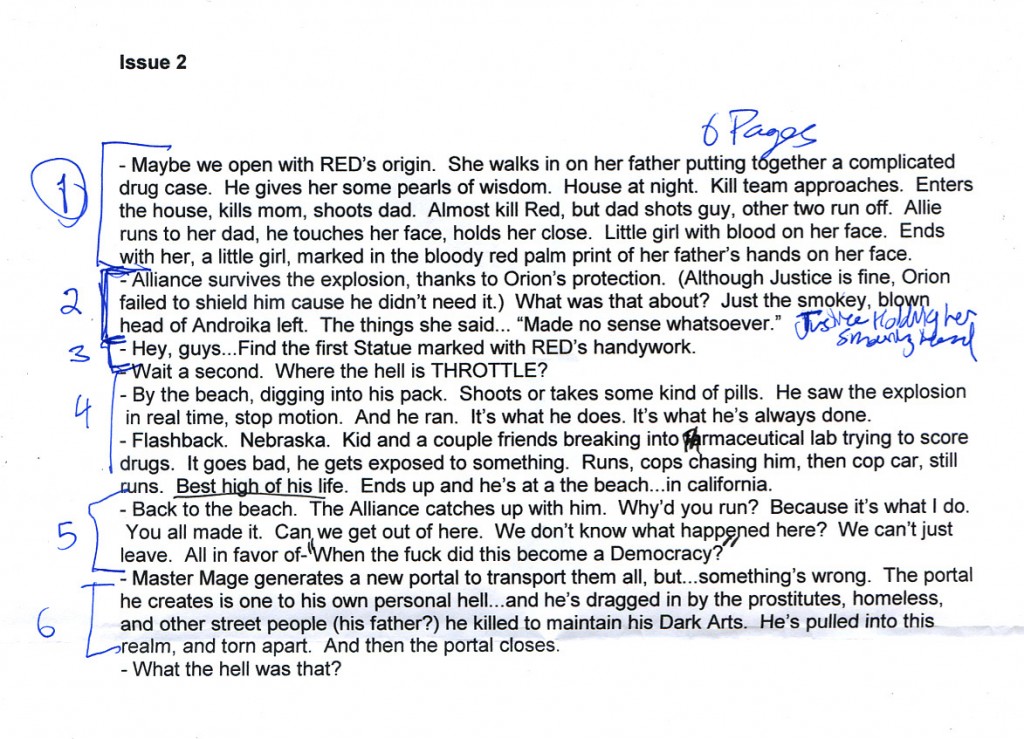
Once I’ve decided which notecards I’m going to use and roughly in what order I’ll put them in, I like to write a quick outline, in paragraph form, detailing the full story for the issue. Now, sometimes this outline is pretty horrible. It’s more or less a rough sketch of the issue, without going into details. Also, this is an outline for me, not really for external consumption. If you’re working with an editor, and want his feedback at this stage, I’d suggest polishing this gem up a bit before sharing. Here’s an example of one of my rough outlines for issue #2 of The Red Ten. (No, don’t expect it to make much sense to you.)
Issue 2
– Maybe we open with RED’s origin. She walks in on her father putting together a complicated drug case. He gives her some pearls of wisdom. House at night. Kill team approaches. Enters the house, kills mom, shoots dad. Almost kilsl Red, but dad shoots guy, other two run off. Allie runs to her dad, he touches her face, holds her close. Little girl with blood on her face. Ends with her, a little girl, marked in the bloody red palm print of her father’s hands on her face.
– Alliance survives the explosion, thanks to Orion’s protection. (Although Justice is fine, Orion failed to shield him cause he didn’t need it.) What was that about? Just the smokey, blown head of Androika left. The things she said… Made no sense whatsoever.
– Hey, guys…Find the first Statue marked with RED’s handywork.
– Wait a second. Where the hell is THROTTLE?
– By the beach, digging into his pack. Shoots or takes some kind of pills. He saw the explosion in real time, stop motion. And he ran. It’s what he does. It’s what he’s always done.
– Flashback. Nebraska. Kid and a couple friends breaking into pharmaceutical lab trying to score drugs. It goes bad, he gets exposed to something. Runs, cops chasing him, then cop car, still runs. Best high of his life. Ends up and he’s at a the beach…in California.
– Back to the beach. The Alliance catches up with him. Why’d you run? Because it’s what I do. You all made it. Can we get out of here. We don’t know what happened here? We can’t just leave. “All in favor of-” “When the fuck did this become a Democracy?”
– Master Mage generates a new portal to transport them all, but…something’s wrong. The portal he creates is one to his own personal hell…and he’s dragged in by the prostitutes, homeless, and other street people (his father?) he killed to maintain his Dark Arts. He’s pulled into this realm, and torn apart. And then the portal closes.
– What the hell was that?
Yup, these written outlines are a lovely mess of half-thought out ideas, lines of dialog and a general map through the issue. The flesh gets tossed on the bone at the actual scripting stage, which might reveal areas that need more thinking or research, or problems with the outline. But with a rough story outline like this, I can at least begin thinking about breaking it down into pages.
3.) Mark Up that Outline
Because the rough written outline is indeed rough, I have no problem marking it up. I can only stare at a computer screen for so many hours a day. So, while I’ll eventually get back to the computer when it comes time to script, I usually like to figure out how the story will break down into pages on paper. So, I’ll go print out that rough outline and mark that sucker up!
The thing I’m thinking the most about here is roughly how many scenes I have, and how they might break down into pages. I might add some notes to the page for things I want to be sure to include, or jot down questions about things I still need to figure out. Notice in the above example, I’ve notated roughly six different scenes for the issue. For the standard 22-page issue comic, you’re usually going to want to limit yourself to 5-7 scenes. If at this point you find you have a lot more than that, you might have too much story for your issue.
4.) Thumbnail the Issue
Comics storytelling is unique in that its pacing is determined by pages and panels. Pacing is important. Page turns are important. New writers will usually struggle at first to take these things into account. (After all, it’s hard enough to come up with a good story well-told.) Even though I have plenty of comics under my belt, and in my head I know rules like “a page turn big reveal need to happen on even pages” and “double page spreads always go even-odd,” I find it helps to physically sketch out thumbs of what the entire issue will look like. By doing this, I start to see the issue as a fully realized book, and not simply one page after another. It helps with planning for my page turns, splash pages, double page spreads, and for determining how long scenes will run.
5) Page by Page Breakdown
I use this one little tool for almost every script I write. And it couldn’t be simpler.
First, number a piece of lined paper from 1-22 (or however many pages your book is.)
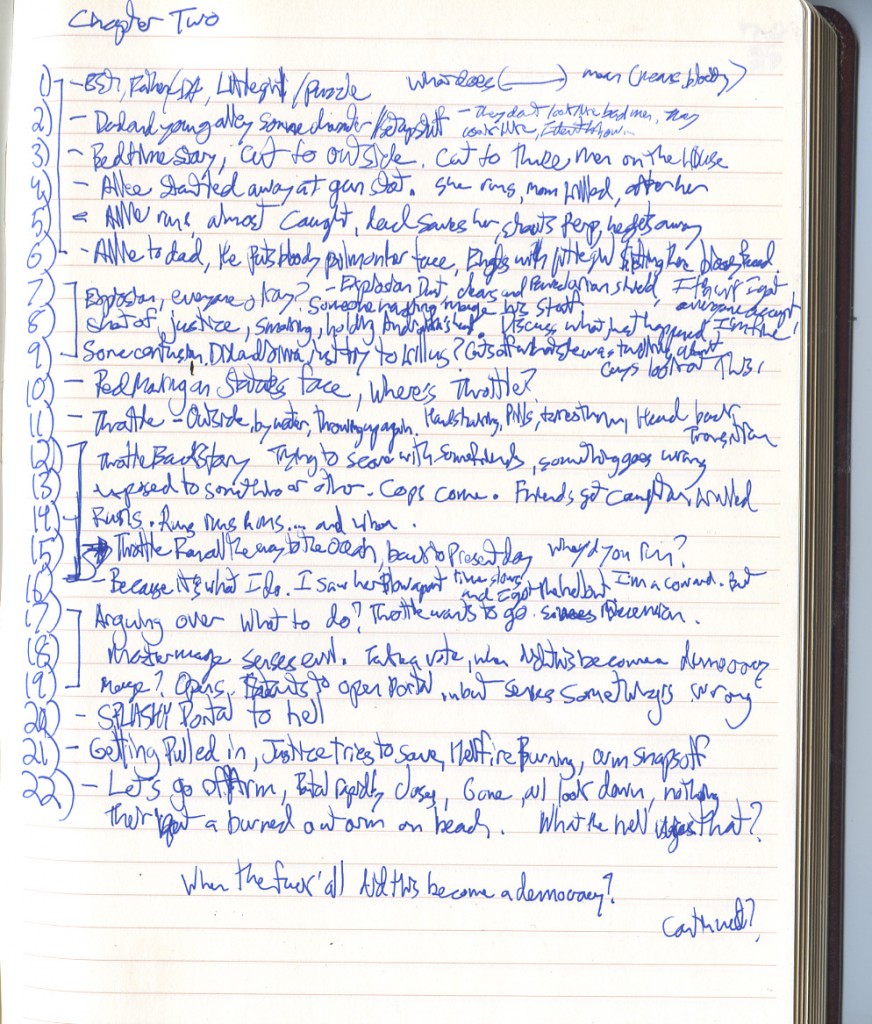
Then, simply write one sentence or phrase that details the main point of each page. You may first want to break it down scene by scene.
As you can see below, I like to draw a little bracket connecting pages that are in the same scene. For example, the opening scene in The Red Ten #2 is sort of an origin/backstory opening for a major character. I determined I’d need about six pages to tell it. (Again, at this point, I’m ballparking it…might end up being five, but probably not seven. Remember, I have six key scenes in this issue. That works out to 3.7 pages per scene on average, so even giving six pages to this one may be a too much. It is a key scene, however, so I’ll stick with for now, and see how it looks on the page.)
All of these tools and tricks are things NO ONE else will see usually. (Unless you’re me, and sharing them with the entire internets.) The only thing that really matters is what ends up on that final script. But I find sitting in front of a blank page is daunting, unless I’ve already done some of this work. However, when armed with page breakdowns, outlines, or notecards (and sometimes all three), I’m ready to write!
What about you? Do you have a bag of tricks you turn to when it’s time to plot your book? Let me know!
***
![]()
 Tyler James is a comics creator, game designer, and educator residing in Newburyport, MA. He is the writer and co-creator of EPIC, a superteen action comedy, and Tears of the Dragon, a swords and sorcery fantasy. His past work includes OVER, a romantic comedy graphic novel, and Super Seed, the story of the world’s first super powered fertility clinic. His work has been published by DC and Arcana comics.
Tyler is the publisher and co-creator of ComixTribe, a new website empowering creators to help each other make better comics.
Contact Tyler via email (tylerjamescomics@gmail.com), visit his website TylerJamesComics.com, follow him on Twitter, or check him out on Facebook
Related Posts:
Category: Comix Counsel












This is not only good practice for writing comics but also for editing. Whenever I’m given someone else’s script, I break the entire completed comic into the PAGE-BY-PAGE BREAKDOWN. Very short sentences to see the overall flow of how things have progressed in the story. It is very quick and easy to do.
Sometimes writers won’t do this preliminary step, or even when they do, they get carried away with writing and forget their guide. By doing it after it is written you can easily see what is working and what is not. Perhaps a fight scene should be extended, or there should be some more set up to the characters.
Unfortunately, it is very difficult to rewrite large sections of the script after it is written. However, if something isn’t working, this is a sure-fire way to find out what that something is. Also it is quicker and cheaper to find it out at the script stage before going to pencils.
All good points, Dan. Deconstructing comics (like Steven suggested in his Bolts & Nuts article on plotting) can be a good way to improve your craft. But deconstructing your own work after you’ve written your first draft can be a good idea as well.
And you’re correct, the more of this stuff you do at the draft stage BEFORE you get your artists involved, the happier you all will be.
‘Even though I have plenty of comics under my belt, and in my head I know rules like a page turn big reveal need to happen on even pages and double page spreads always go even-odd,”
This is interesting. Double page spreads, I think, don’t work very well in the webcomic or IPAD medium. I’ve always been thinking of each page of my scripts as a storytelling beat in and of itself, but I can see how that might hurt the readability of a trade paperback.
Actually, Scott, a lot of the iPad/mobile apps are still built based more on the “spread” model than on the individual page model. Check out Graphic.ly’s app, for example.
But you are right in the larger point that one needs to take the ultimate format of your comic into account. But if you ARE calling for a Double Page Spread or DO intend on taking advantage of page turn reveals, these print conventions still do matter.
I just played around with Graphic.ly on an IPAD and it sure seems to me to default to a one page at a time format for traditional comic sizes.
I’m not entirely convinced that a two page spread in Graphic.ly is ideal or even desirable. You can’t view the whole image at once, as far as I can tell (I just checked on an IPAD, I haven’t used it extensively) the advantage of two page spreads in print doesn’t translate to the IPAD at all. The true equivalent of a two page spread would require two IPADS side by side.
In this age of Internet and laptop computers, it’s so very easy to forget about plain old paper tools. Whenever I sit down at the computer, I often find myself stuck because I feel some kind of pressure to produce the perfect script right way. If you’re anything like me, you need to keep away from the computer and stick to paper for a long time before pounding away at the keys.
Heck, I even have to use plain white paper since lined sheets still intimidate me with all that “structure”!
I’ve got to admit, I’m lazy.
I got to be lazy because I used to write my scripts twice: once in longhand, and then I would type them out, editing as I went. I did this for short stories, too. I did it for years, because I didn’t always have access to a computer. (Or I was bored in class.)
Now, I’ll write up a preliminary plot because I generally know where I want the story to go, and then I’ll sit down and zoom. That’s because I (unknowingly) trained myself to slow down and think as I wrote my stories longhand. When I started typing, I learned what I was cutting out, what I could do better, and what I could do to speed up my process. Now, I can go from notes to a pretty tight first draft, without a lot of the steps that Tyler goes through here. (Then again, I don’t start writing until I know where my story is going, which helps a lot.)
Well I use note books. They are great to jot quick ideas and rough scripts. It’s a lot easier to throw free-form ideas around. Scribble things into the margins. Hell sometimes I even use ideas bubbles I just find paper more conducive to creativity. Then I slap my comic scripts into formal script.
For my more involved scripts, (like superhero comic I am writing for friend) I’ll write a plot points into a notebook. I think that helps for me give a rough idea on the pacing of the book by giving a framework to transition from a certain scene to another knowing how the story should progress.
This is a really cool article Tyler!
This is definitively a great start for me as I’m starting to plan a new project where I would be only writing.
I’m wondering how having separate notecards for each idea is different than listing these ideas in a word document. Thoughts?
Thanks a lot!
Hey Antoine. Thanks for stopping by!
As I tried to convey in my article, with writing there is more than one way to skin the cat. I know at the scripting stage, I’m going to be buried behind a computer typing. So, sometimes I like to do some non-digital activities. It keeps things fresh, and keeps my eyes from bleeding so much.
With notecards, you get to physically manipulate your ideas: Move them around, sort them, stack related ideas, re-order them in different ways, and toss out the crappy ones. Sure, you CAN do this in a word doc, but aren’t you already spending enough time in front of a processor?
Granted, I don’t use notecards all the time. But I like knowing they are available if I get stuck. Give it a shot and let me know if it works for you.
Great article.
I’ve been a big fan of breaking my stories down with note carsd since I read Blake Snyder’s “Save The Cat”. (Best book on screenwriting I’ve ever read!)
Lately I’ve been using this app for th iPad which feels like it’s been developed specifically for this purpose.
http://itunes.apple.com/gb/app/index-card/id389358786?mt=8
Not only does it give you the ability to colour code the cards (useful so you can see at a glance your action beats, your talky beats etc…), it also allows you to flip the card to reveal a full A4 style lined notepad page to make more detailed notes on each beat.
Downloaded that one a few weeks ago myself on a recommendation from Jason Ciaramella.
And if you loved “Save the Cat”, make sure you grab “Save the Cat Strikes Back!” for more structure gospel!
http://michaeltelusma.wikispaces.com/Crow+Lake-+Plot+Development I make a chart like this on MSpaint, and I type in notes for each scene for the rising action/climax ect.
To keep it organized, I colour code. Main plot line is all in black, for subplots I used red, and for scenes that will need some extra thought, research, or I’m just no sold on, I use green.
I find that doing it on chart like this really helps with keeping the story paced, especially when writing a mystery, and information is slowly being revealed.
Typically, I first write out the whole summary of the story from the beginning, to the final part. Then I write the story in a prose format.
I write up a pre-script, that is in between script and prose. This is when I figure out what can, and cannot actually be drawn. Things that can’t be drawn are relocated as narrative captions. Character descriptions to profile captions.
Finally, I write the script. This is the part that turns a 300 page script into a 230 page script. And then sometimes if I have time, I try to thumbnail them.